July 18, 2009
 Chimney is Delivered
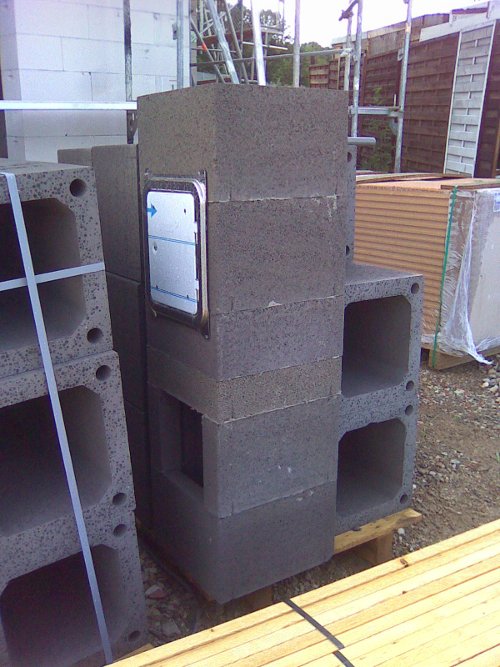
Our chimney is an Erlus ceramic chimney. I believe it is a good quality chimney and the assembly was easy enough. As you can see the first few sections are pre-assembled for you. As I mortared it together I ran into a few difficulties. From these difficulties I learned a few points of interest for any future chimney builders.
In the following picture the clearance to large surfaces of wood is 5 cm. The regulation here in Germany, I am told by Aktiv Bausatzhaus Südbaden GmbH a clearance of 3 cm must be kept from non-burnable materials. Here you should fill this 3 cm with an appropriate insulation, ie. Rockwool or such. My recommendation is that you do not start to or continue with the building of your chimney until Aktiv has provided the insulation. Placing the insulation at the time of cementing the chimney in place is much easier than doing it after. For the upper part of the chimney we received 5 cm Rockwool insulation and were told we could split it in two. This just doesn't work so wait till they get it right.
 Erlus Says, "Not the best"
I went through a lot of stress or worried moments when it came time for the connection to be made from stove to chimney. Aktiv Bausatzhaus Südbaden GmbH told us that the company we bought the stoves from would gladly drill into the chimney and make the connection when we purchased the stoves. This can be done at a starting price of about 200 Euros per connection :-(.
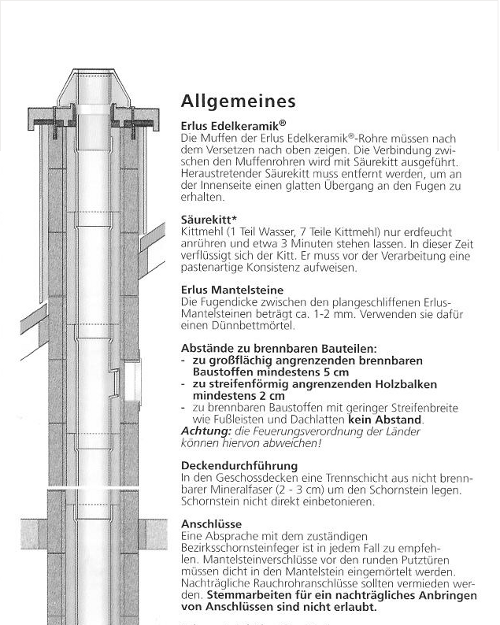
The excerpt beside this text is taken from Erlus's assembly instructions. It states in plain German that you should avoid making connections to the chimney after it is built. Erlus supplies connection tees for their chimneys and they highly recommend using them when you build the chimney. It may take a little planning on your part to make sure you have the connection on the right side of the chimney and at the right height but it is highly recommended.
If I should ever build another chimney the chimney would have to be planned correctly with the correct connection pieces.
October 31,2009
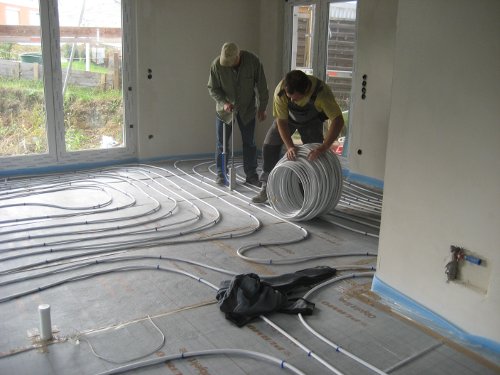 Not Enough Clips, be Careful
Well it has been a night without sleep. The estrich company is already started in the basement and we are finishing on the main floor. Here are a few tips from us.
Use enough clips. You will fill the lines with water before the estrich is poured. You may not get all the air out and the lines will tend to float. If the lines are high in the estrich the heat dissipation will not be as uniform and you could have temperature variations in your finished floor.
The room we are in has a diagonal length of 17 meters. 3 separate loops of heating pipe are laid here. Take a moment to divide the area into 3 equal divisions and lay the loops accordingly. Our kitchen will heat slightly faster and the other loops are near the maximum length allowed.
We chose not to have heating under our kitchen cupboards. If one should decide to change the house layout later you may have difficulties. Where my jacket is laying we have stayed a little too far from the cupboard and we have a cool area there. Draw out the plan of your kitchen and do not leave too much clearance if you choose not to heat under the cupboards.
November 13, 2009
- Many builders hope for finishing things before Christmas or New Year
- There is more stress and less time for all
- Surprise, heating company Heima decides no futher heatpumps (ours included) connected temporarily, blames electrical contractor
- Electrical contractor hears this from us and disputes such a claim
- Electrical contractor can install main panel just before Christmas
- Before Christmas we must dry our Estrich (floating cement floor) so we can lay our tile and install the kitchen
March 17, 2011
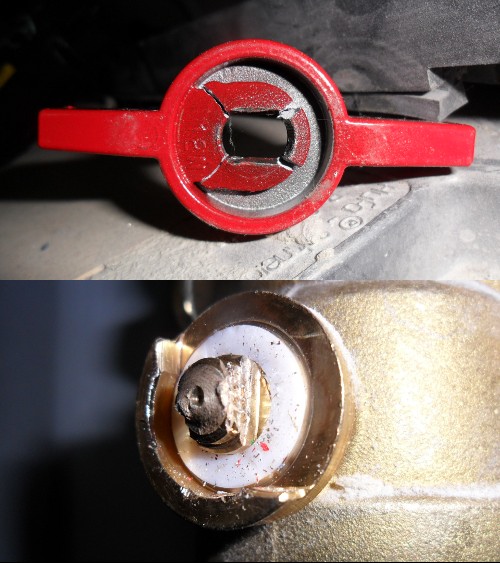
 3 way valve installed incorrectly by Installer
-
The heating system is an important consideration in your budget and planning. As an end result we all hope for a cost effective and comfortable system. The Daikin heat pump offered by Aktiv in their package is from what we have been told a good simple system. Unfortunately we have had problems and found out some of the disadvantages to this system. In the following I will discuss the major problem and follow that with some of the disadvantages you may not be told about.
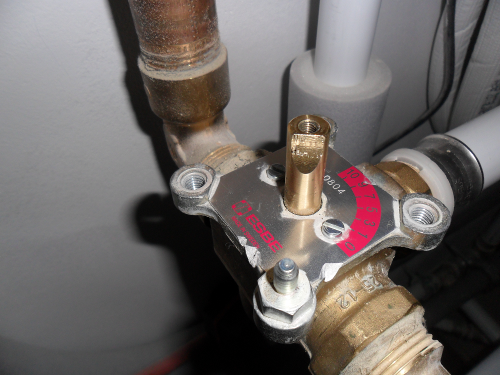
To set the stage the heating system is offered to you from Aktiv Bausatzhaus Südbaden GmbH. The work that is done for you, or at least in our case, are the connections to electricity, refrigerant and fixing the main devices in place. This work was done by HEIMA GmbH & Co. Hausinstallationen KG or a sub-contractor working for them. Our system was assembled very late one night/morning in November 2009 and shortly there-after filled and made operational. (As mentioned above getting to this point had been a large frustration.) Aktiv and Heima have been contacted many times between then and this date shown above with regards to our heating system. The technical adviser of Aktiv's has been in our house many times since. On 3 occasions at least 2 different technicians have come to our house because I have told them something is wrong with our heating system, in particular the valve you see shown on the left or above.
This valve is made by the company Esbe. As you will see the valve is driven by a motor that turns the shaft you see coming from the top of the valve. A scale showing the values 0 to 10 shows the range of positions this valve should operate in. I had complained that the valve was turning hard because of the sounds I heard from the motor driving it. This is the position I found the valve in after removing the motor. The position of the valve is taken from the flattened side of the shaft. The valve is turned 45 degrees clock-wise more than it's operating range. This means that although our heat pump should be heating only the floors of our house it is also pumping reduced temperature water to our hot water water tank. This you do not want! This also likely explains our unexpectedly high heating bills for more than the first year.
July 9, 2011
 Technician breaks shutoff valve
-
Finally after more months another technician shows up. This time the same fellow that installed the system. After a quick glance he says the equivalent of "Oops, I did that or?".
After a few minutes checking in his truck (plain white panel van) he comes out with a mixer valve. Did he come prepared or not? With the valve in hand he and his assistant start to change the valve. At the bottom of the inside unit of the heat pump they break the handle and shaft of the shutoff valve. This can be replaced but they cannot reopen the valve and do not have spare parts in their truck so the work is stopped and our heating system complete with warm water is now out of operation. With many apologies the technician tells us he will be back first thing the next day (Sunday) if that is okay. Yes, please come.
July 10, 2011
 Vise Grips to the Rescue
I waited till 14:00 on Sunday and then decided to try North American style to open the valve. Yes, I did offer the vise grips to the technician but I have learnt as a heavy equipment mechanic here in Germany many German, technicians/mechanics do not respect vise grips for what they can do or hold. North American style the valve was open in seconds and I returned our heating system to operational condition. On the Tuesday following Heima's technician returned to replace the long defect mixer valve and the newly broken shutoff valve.
Our heating system was first installed in November of the year 2009. It has taken many reclamations to both Aktiv Bausatzhaus Südbaden and Heima, information from the valve manufacturer, and a lot of my personal time to reach this point in July of 2011 when we can consider our heating system to be functioning properly. Consider your options carefully when it comes to your heating system.
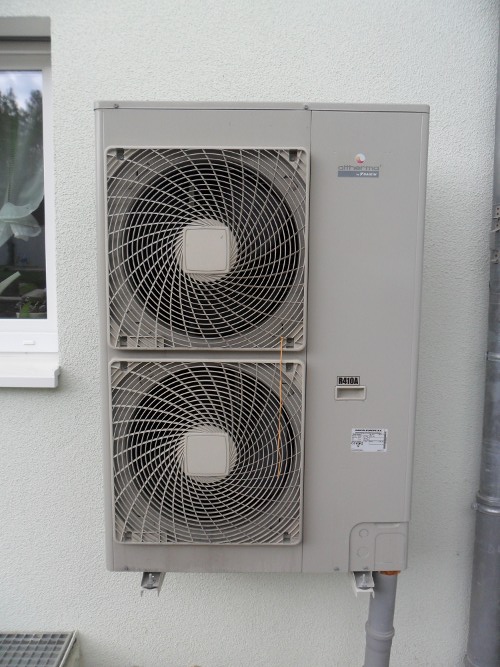
 Heating System Mounted on Our Wall
The heating system offered to you from Aktiv Bausatzhaus Südbaden GmbH is likely to be pre mounted on a white metal frame. I saw the unit in our neighbors house. After much discussion with Aktiv it was agreed upon that we could have the materials mounted on our own wall. Honestly, the kit does not look like it really belongs to your house and the arguments about saving Heima costs I tend to doubt after seeing and helping with the installation.
What is interesting is that my neighbor also then removed his heating system from the frame and installed it properly onto the wall of his house.
 Our Heat Pump Tips
Here is some general info on heat pumps.
Under extreme conditions the outside heat exchanger will sometimes become very restricted with frost before the unit activates a defrost cycle. With the fans running at high speed the unit can become noisy. Attaching the unit to your house wall can transmit this noise to your house. When there is no other noise in your house you will hear the operation of the heat pump. Therefore if you have a more suitable location install the outside unit on its own stand sufficiently away from your house walls. 1 meter should do in most cases.
Our Daikin can heat water to 55 degrees using the heat pump. This means that it can efficiently heat your hot water to about 47-48 degrees. Heating your hot water above this temperature is done with an auxiliary electric heating element. Many consider this an expensive way to heat your hot water so to get the best value from your heat pump hot water is only heated to this temperature. Taking a hot shower means that you will more quickly use the reserve hot water from your tank. Also, rinsing spaghetti as I would in Canada does not work. You can set the desired hot water temperature up to a maximum of 78 degrees and use less of your heat pumps cost advantage.