May 15, 2009
 Window wells too Small
This was the start of some major frustrations in regard to our window wells. The delivered window wells were to small and in two pieces. In the following pictures you will see our problems and hopefully you can avoid these frustrations.
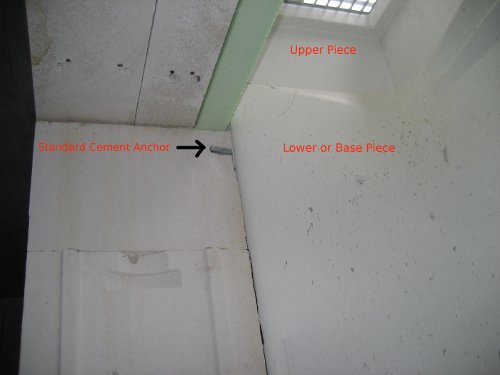
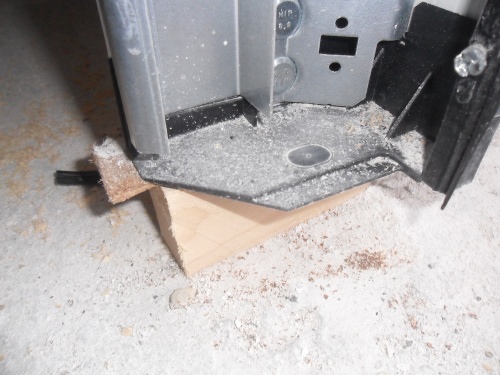
As seen in this picture the screw anchors broke the sides of the openings out in several places because they were too close to the opening. You can see the standard cement anchor we were supplied with which are not optimal for Ytong blocks.
Also note the window wells we were supplied with are in two pieces. This caused and may cause trouble in the future. We were told this leaves us flexible to adjust the finished height of the window. This upper piece is hard to securely attach to your basement wall. Also if you read the instructions additional hardware is needed if you plan to load the grate or even use it as a step. The extra hardware was not delivered. I made the mistake of not filling crushed stone against both pieces at the time I installed the wells which also did not help the situation. Since I have checked several building sites here and the window wells do come in various sizes so I recommend that the window wells should be one piece and properly sized. If you are planning to use them as steps consider the option of cement window wells.
The polystyrene has been kept to the outside as shown in the architects drawings we were given. You will want to ask Aktiv Bausatzhaus Südbaden GmbH if this detail has remained so as it caused some complications. Even with the complications the end result in my opinion is worthwhile.
 Modifying the outside sills
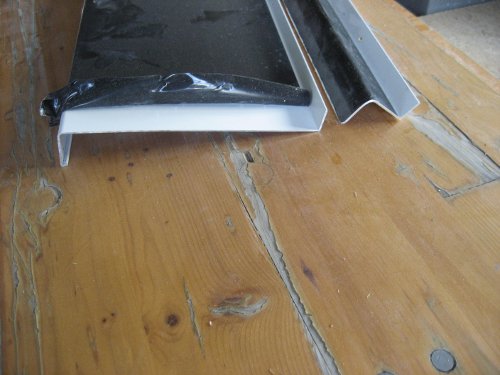
Well you should really have a sheet metal brake for bending the sill but if you want to finish some things on time, improvisation might be called for. It took half a day or so to modify the delivered sills so I could use them. Even as seen in this picture I still had to cut more off the bottom corners because of the small window wells.
Okay, why? The problem starts with the architects drawing. The insulation is on the outside. If I had set the window back were Aktiv Bausatzhaus Südbaden GmbH wanted me to I would have created a cold bridge at the top of the window. This can develop into mildew problems and etc. Was there enough room for the delivered sills and end caps for the sills anyways, no! I have learnt building here in Germany that there are many opinions and often conflicting. With a little understanding of physics and taking the time to think some issues through you may save yourself a lot of frustration. In this case the options were straight forward.
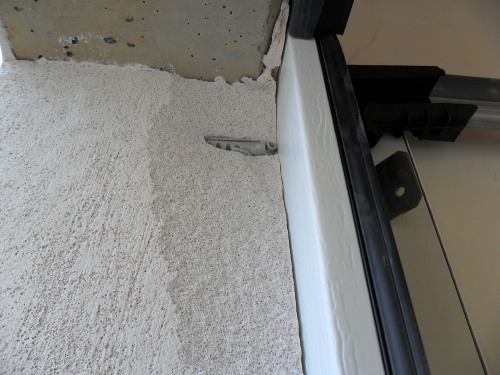
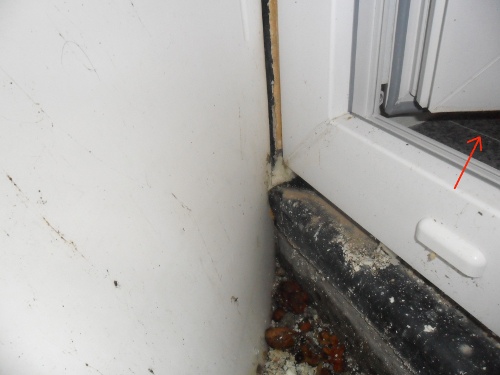 Sill Installed In Window Well
The sill is in place. Moisture can be seen below the sill since it has been damp for some days before the picture was taken. At one point I was told I could simply not bother installing the sill as it was not really needed. You be the judge. I am glad to have my sills in place even if they are not quite as should be.
Yes, look around, sills are installed in most all cases and the window wells are big enough to accommodate this. To seal the windows in your basement use spray foam that is water-proof. This can be a wet spot so don't take chances as water problems are not much fun.
The red arrow indicates the joint in the inside sill. Aktiv Bausatzhaus Südbaden GmbH delivered the inside sills in two pieces. Two pieces is not ideal so check your options early.
 Jascha Curled Up in Window
The large inside sill has some advantages. In addition to the uses our boys find for the windows I find the optic pleasing. The set back window adds a feel of space to the room and since most of our basement rooms are considered living space this is nice. I would also adventure to say that more light comes into the room with the window set to the outside. For these reasons I have no regrets about the extra work and time we had to invest. Building a house is a major project and there will be enough extra work so I hope what you have read will help.
June 15, 2009
 Ready for the first floor
-
Well here we are. The walls, interior as well are now ready for the next floor. Load bearing walls are all level with each other and the other walls are made 2 cm shorter. The blocks we are using for the outside are 36.5 cms thick. Load bearing inside walls are 17.5 cms thick and others are 11.5 cms thick. In some places I-beams will carry the flooring weight to allow us to have larger open areas. At the places where these beams sit on the walls the normal blocks are replaced with a stronger poured cement.
I did write, "Ready for the first floor". Please don't confuse me more as I am finally getting used to calling the second floor the first floor. In Germany you have the main floor which is added to with "Geschosse" or levels in English. The first level becomes the Canadians second floor.
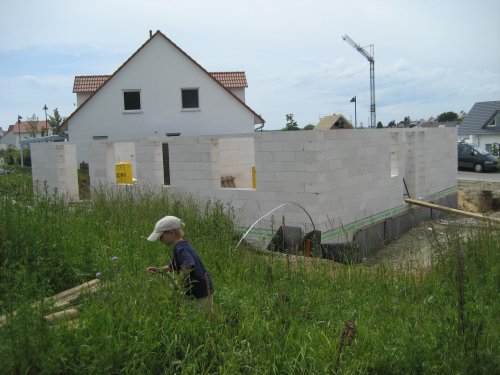
Jascha is investigating our wild backyard. If the grass would grow as well as the weeds we will have a magnificent backyard.
July 13, 2009
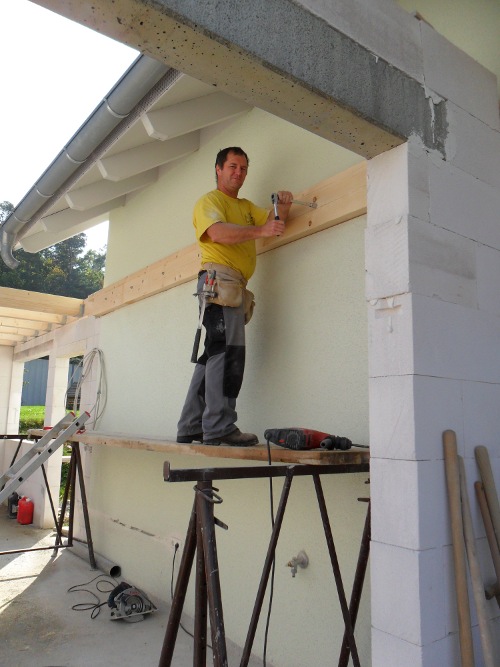
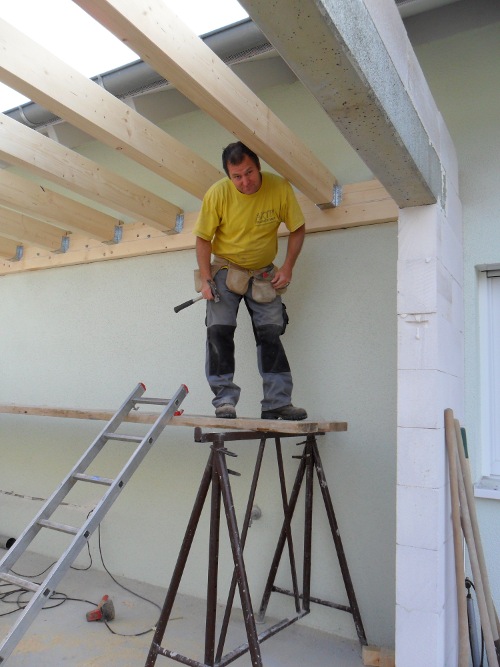
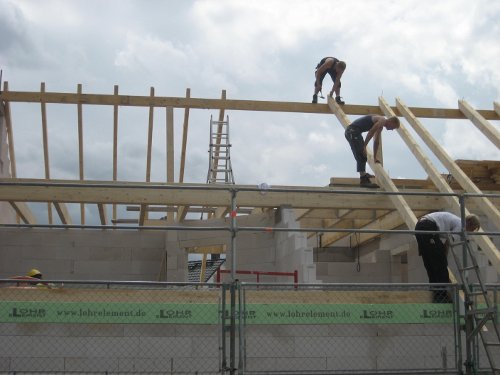 Holzbau Rehfuß GmbH Workers
Here are the young gentlemen from Holzbau Rehfuß GmbH. They assembled the beams and rafters for our roof. This is the time to put any materials you will need for your attic in your attic. The workers did not put the insulating material or at least a part thereof in the attic. Save yourself some work and if you are using the hard board insulation have a lift or two set up.
If you are considering to finish your attic some day, also consider putting up your drywall. You will have to take care of it through some weather and moisture but believe me it is a lot of work you will save in handling it from the road at a later date. Some contractors do think about such things.
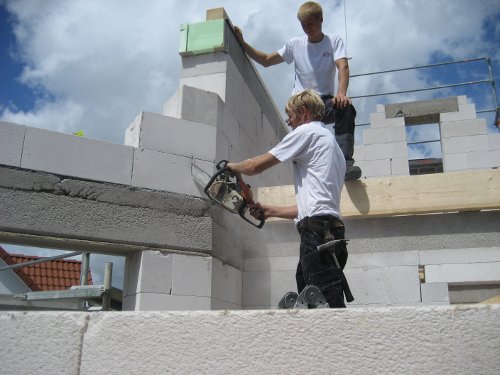 Now Don't try this at Home!
Now I would not have believed it if I hadn't been there taking the picture. This just shows how easy it is to work with Ytong blocks. I don't know if I would lend my Husquavarna to this fellow but time is money and in this case the job was done and in short time.
 Opening for attic stairs didn't work
Well we all missed on this one. As it was the stairs would have folded out into the wall before reaching the floor or ended in the air. The job of changing them involved moving the full length joist as well as the shorter pieces around the opening.
 Again a shortage in materials.
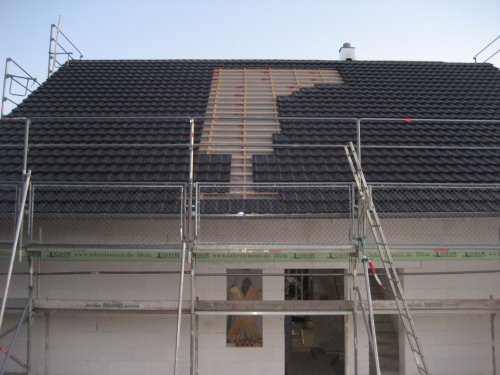
Well folks we gave it our best shot. Here you can see the material shortage we had on this Saturday. With an elevator and more than 8 wonderful helpers we would have closed up our roof. What is missing is approximately 200 tiles. The mood for all was somewhat of frustration but we managed anyways to have a small party afterwards.
We will let you know how Aktiv Bausatzhaus Südbaden reacts to this error.
Our roof like most has a textile fabric covering the rafters and insulation. This fabric is water-proof so the delivery of our remaining tiles took a couple of weeks or so. The responsibility of the short-coming was shoved between individuals. This added to our thoughts about communication problems between those that should be communicating.
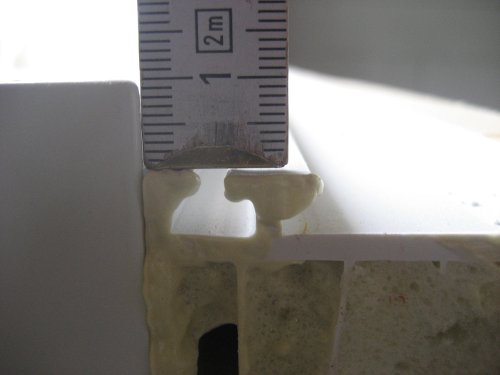 Windows too Tall
In this picture you can see the window frame and folding blind assembled. The side rails for the blind are set even with the bottom of the frame and the case for the blind sits on top of these. The ruler is showing the increased size of the case height in respect to the top of the window frame. This increased height of 5 to 10mm caused problems.
The outside sills angle down from the bottom of the window frame also needing more height than the frame itself.
 Enlarging all of Our Shorter Windows
Due to some miscalculation no one is willing to own up to I had to enlarge all of our window openings that were not full height units. This took some time with the plane or rasp that I had from Aktiv. I used the grinder to make grooves that I could follow as a depth gauge. Remember, in order to properly foam the windows you must have room to get the tube of the aerosol can between the window frame and the rough opening left for the window.
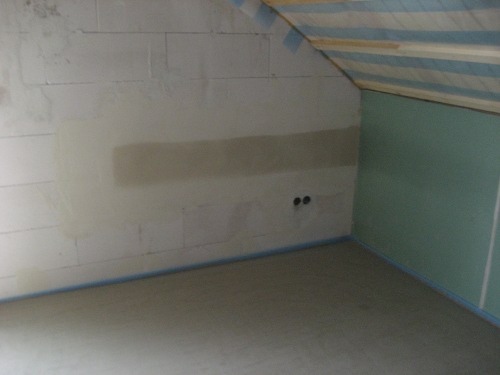 Low Energy House but ...
This dark area is cold and damp. Moisture is still escaping from the fresh plaster. Behind this thin coat of damp plaster is a cement and steel reinforcing band that goes around the corners of the room behind the drywall and reinforces the point of contact of the rafters. To the outside of the band is a thickness of 5cms of polystyrene insulation. The same use of polystyrene takes place at the height of the structural floors. Even after 2 years this area shown in the picture remains colder than the rest of the wall.
Just above and below the polystyrene heat/cold can transfer through the 5cm of Ytong block and then enter the cement. Since cement is not a good insulator this heat/cold energy travels quickly to the inside surface of you wall.
Although our house and many like it in our subdivision are made this way I think this is a weak point in the construction process. If I was to do this kind of block work again I would make sure that the polystyrene on the outside of such cement work extended at least 5cm above and below the concrete band. You could cut a notch in the block quickly with a large grinder. With this method the thermal bridge would be largely reduced.I have seen some contractors use a thin layer of polystyrene on the inside of such places as shown in the picture. I am not sure that this is a good idea because although the inside wall surface will be warmer the temperature of the cement band will likely be somewhat colder. Than could make for other problems and reduces the heat saving/moderation value of the wall.
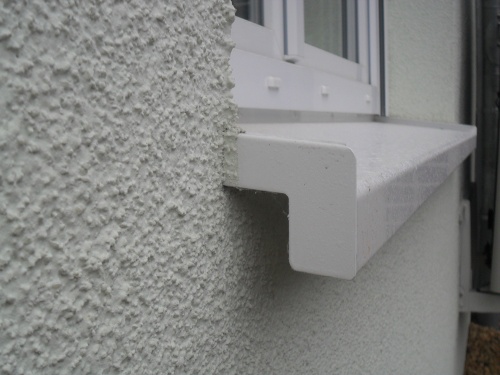 Overhang was too small
The inset of the window frame is set by the size of the case of the folding blind. With the originally delivered sills Aktiv Bausatzhaus Südbaden sent us the finished plaster would have likley touched the inside vertical edges of the sill overhang. I contacted Aktiv and questioned this detail. I was told that the overhang we had was within the build code regulations.
At the time of the first visit from the company we chose to do our outside plastering we were told that the company would not be able to guarantee their work due to the inadequate overhang of our window sills. After further discussions Aktiv agreed to replace the sills. Naturally we had to do the work.
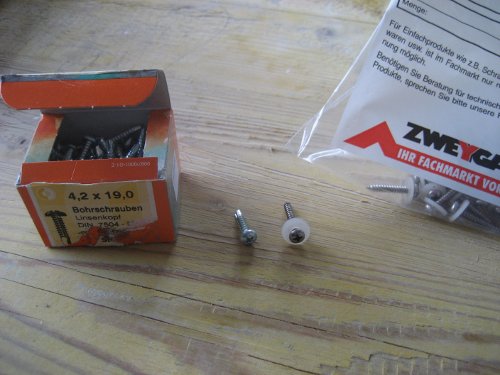 Use Window Sill Screws
Yes there are window sill screws. The box on the left is what Aktiv delivered us and the bag on the right are the screws I found in a local fastener shop.
The galvanized self tapping screws just didn't quite look right for this job. In the fastener shop I started to explain that I wanted a small screw for outside that would not rust. I would be screwing it into a hard plastic so I was not sure if it should be self tapping or not. Much to my surprise the young lady questioned if a simple stainless window sill screw would not work. If Aktiv does not deliver them you will find these screws elsewhere.
 Ytong Blocks Support Life or Not?
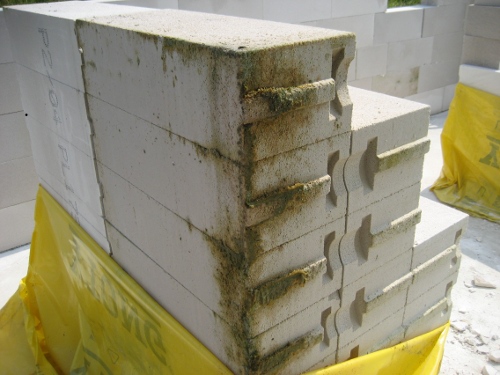
Well Jogi told me that Ytong blocks don't support those normal types of life like mildew or such. Perhaps some soil on top of this lift added with water did this. I have included this and the following picture to alert all to the possibilities of unnecessary cleaning work. Read on to find out why.
The Ytong block we used were relatively okay as far as tolerances go and the quality seemed okay, other than the 10 cm blocks that dried and shrunk leaving the partitioning walls in the air. Yes that was some sort of processing problem at the Ytong plant. Jogi found some mortar that expands as it dries so our couple short walls only swung for a couple months. Anyways, in general okay and with a hard brush you can clean such growth from your blocks. These blocks had been stored in the open for many months.
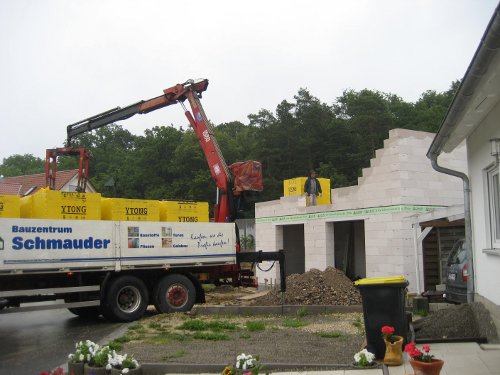 Schmauder Loader makes holes
Okay, here is the culprit. The loader used by the delivery company has 4 protruding tabs on the under side of the picker/grapple. Not all but most of the lifts will have the protective plastic damaged. When the lifts are rained upon water will enter under the plastic where it will remain for a long time. You can tape these holes to reduce the effects of water and heat under plastic foil. Remember as well that water in your blocks adds weight and after a few thousand blocks you may appreciate the light ones:-)
 Plans from Aktiv not space saving!
If you read further on this page you will see that the original drawings for our garage called for 24cm walls with the wall against our house being doubled. Perhaps the architect thought we may want to heat the garage some day. The roof was to be made from cement slabs accounting for a substantial weight. I gave this topic little thought as we prioritized the building of our house first. This was not an ideal choice as I have now learned. Aktiv Bausatzhaus Südbaden ordered all the required prefabricated cement floors as the plans called for. The four slabs planned for our garage roof sat on our site for over a year as playground for our and the local kids.
When it came time to consider the garage I very quickly saw the inefficiency of the planning. If you are not going to heat a garage 17.5 cm Ytong blocks are more than adequate for supporting a cement roof. A second wall against your house wall is also over-kill. By changing the design and materials we have gained 30 cms width inside our garage. We used the slabs as our garage floor although this is not ideal or without complications. The changes made for more frustrations for us and likely Aktiv Bausatzhaus Südbaden as well but every time I walk into the garage I am thankful that we went through this process and have the extra space.
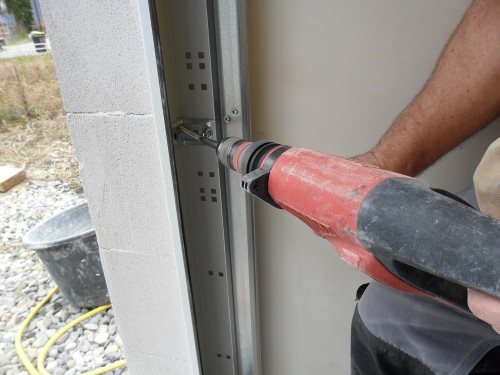
 Rafters in Place
Now our rafters are hung from the house. The height matches that of our second floor. Attaching the roof load here is ideal. At this height I have removed the plaster and a very small amount of the insulation protecting the steel reinforced cement ring around our second floor. The beam now sits level on the outside corner of our top row of blocks for our house's main floor. With the thickness of this board we have likely gained insulating value at this area. The anchors I used are long steel bolts within a steel collar. As you tighten the nut on this bolt the fastener will expand its collar within the hole making a secure hold on the cement. Consult your local building center about size and number.
Noticeable on the secured beam is a faint blue line. From a reputable local company that helped us with the design and materials for our roof this line has a 1 percent slope. Ideally a flat roof is not flat but slightly sloped. On top of the rafters we used a thick tongue and groove natural wood covering. I do not recommend composite materials (materials with glue) due to the damp conditions that can develop in garages. Whatever fastener you use to secure the sheeting make sure the heads of the fasteners are adequately recessed.
When it comes to sealing your roof you may be surprised to find Aktiv Bausatzhaus Südbaden does not cover this. Yes, it is written in your agreement if you have read carefully, which we didn't. I think it comes down to this, you are the builder and can make mistakes which Aktiv Bausatzhaus Südbaden GmbH does not want to be liable for. In our contract balconies, Terraces, flat roofs, patio doors and etc. are not covered. With our long garage and many patio doors these added costs are not small.
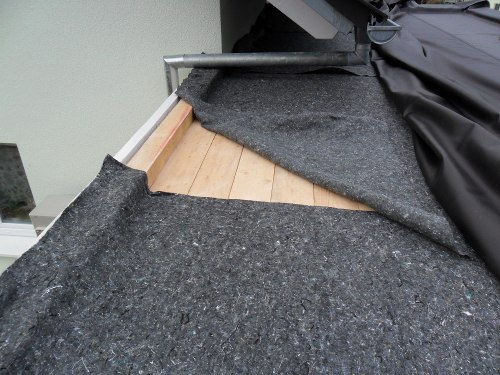 Materials used to seal roof
There are several points of interest here. By using wood for the roof I had to glue a thin face of Ytong block material on the top row of block to hide the wood behind. On top of the tongue and groove around the roof edges a 4x4 must be screwed down. In metric the size I was recommended was 8x8cm. The width is okay but I would use next time a height of 12 to 15 cms. The increased height leaves more room for a thicker layer of earth on the roof and better spacing to the metal profiles needed to cap the edges of the roof.
I used a felt material to protect the elastomer material both under and on top. The elastomer material is a little more costly than traditional asphalt and tar methods but should have a longer lifespan and is easier to work with. In our area you can find info at RTH-Elastomer-Technik GmbH.
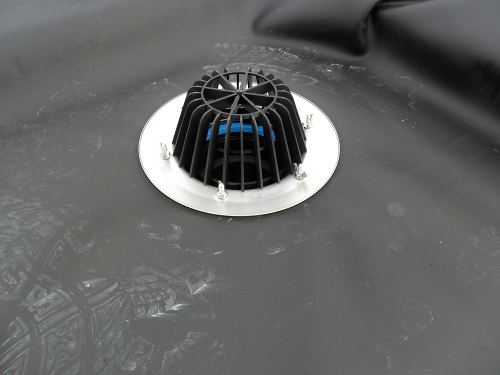 Drain is simply bolted down
Mounting the drain in the lower corner of the roof is easily done with a jigsaw and drill. Around the drain you will spread stone on top of the felt acting as a filter to water and debris that will come to the drain. Between the felt and earth material can be used a drainage material/cloth. I should explain that the town here requires plants on your roof in most cases. Not many builders have held to this regulation due likely to the plants abilities to make leaks in roofs but again the elastomer materials should be more resistant to plant life and the ecology benefits can be substantial.
The final job is to cover the edges. Being "Do It Yourselfers" we considered many options but in order for it to look tidy and nice we hired in a sheet metal company to finish the top edge. There are many choices for the metal to be used and also many price variations.
 Roof Finished
- Even with the shallow 4 cms of earth that we have Mother Nature is slowly filling the green in. Our garage is sufficiently higher than many of our neighbors such that our winter/summer tires can be stored bolted to the roof above the garage door. We are happy to have the increased size of our garage so we have not made comparisons to pre-fabricated garage costs. Our added costs, unexpected costs, for our garage are at this point 5,400 Euros.
Our garage was a source of frustrations that we didn't really need financially or otherwise. If you think some of our concerns and variations to the normal plan are worthwhile, do yourself a favor and clear all the particulars with your building company before you start and before you sign.
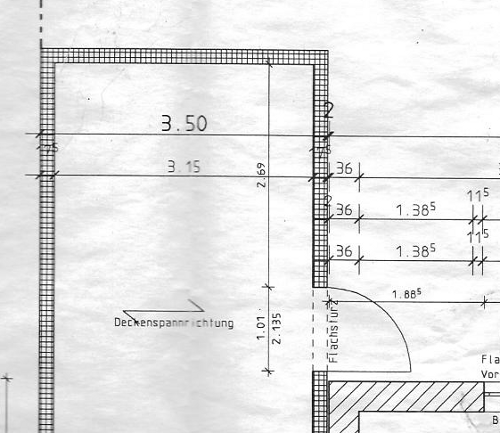
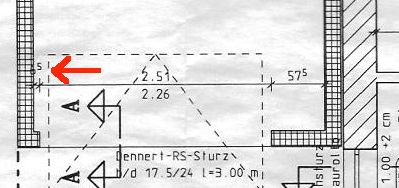 Garage Door Problems.
This drawing from the Architect (Dipl.-Ing.(FH)) Stefan Dotterweich was given to us from Aktiv Bausatzhaus Südbaden GmbH. If you read carefully the measurement for the inside width of the door jamb shown by the red arrow is 6.5 cm. After finishing our block work we questioned this when we saw how little area was left as the door jamb. We were told the measurement was correct and we would receive a suitable garage door.
 Frame Foot is for finished floors.
It was getting late in the year and we wanted to have our garage closed up. Aktiv Bausatzhaus Südbaden GmbH delivered our door. I had been instructed that the door would be assembled prior to the finished floor being poured. This secures the rails in the finished floor.
When we received the door I was puzzled by what I found. Looking at the foot you would suspect that it should sit on top of the finished floor. I then looked at the mechanics of the rails and distances of travel for the door. It was not physically possible to sink these feet into the finished floor and have the door close properly. Considering the time of year we assumed finishing our floor in the garage would not be possible until spring we decided to assemble the door as best as we could.
As you can see I supported the feet on some small wood blocks approximately 5mm above what I thought the finished height of our floor would be. For this first winter the door closed properly leaving the gap at the bottom for the finished floor.
 Ytong Blocks Break in Jam Area
The next problem starts with the 6.5 cm jamb size from the architects drawing and the incomplete mounting hardware delivered with the door. As I have told Aktiv Bausatzhaus Südbaden GmbH repeatedly the manufacturer of the door recommends a jamb width of at least 7.5 cm. 9 cm or more so you have room for a normal plaster thickness inside the opening. There are various hardware configurations including the brackets to mount to the side wall as would have been necessary in our case.
Notice in this picture the type of anchor used. Correct, we did not receive the correct Ytong anchors. If oriented in this rotation the most force applied from the anchor will be in a vertical direction. In this case paying attention to this detail still resulted in the jamb breaking out.
 Suggested Hardware from Manufacturer
This picture I have taken from the assembly guides found on the manufactures website. I have repeatedly asked Aktiv Bausatzhaus Südhaden GmbH for this hardware but into 2012 I have received nothing.
 Hilti and long screws fix
In order to secure the rail in the corner I put the reinforcing brackets on the inside of the rail and drilled them out in the corner so I could put a long (18 cm) window frame screw through into the block wall corner. Although not ideal to directly screw into Ytong blocks this was our only possibility and it appears to be holding so far.
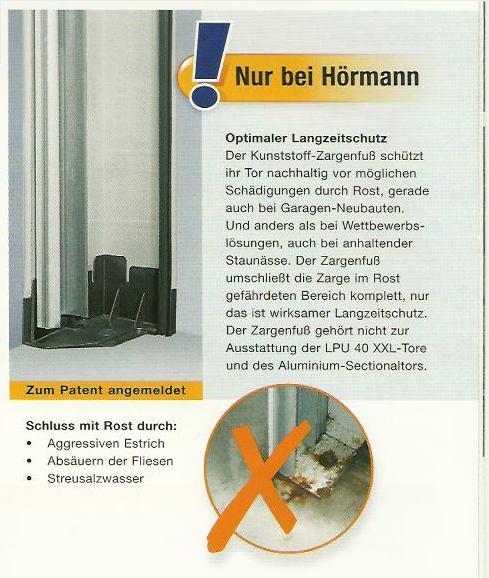 Hörmann is OK especially the foot
Since we have built in a new subdivision we occasionally have sales people showing up or just leaving brochures on our door step. This picture is taken from the Hörmann Brochure that we had forgotten we had. What they are showing is that they are trying to patent their plastic foot idea. Since the plastic foot rests on top of your finished floor, corrosion problems are eliminated.
I can recommend the Hörmann garage door. The installation instructions are fairly detailed and complete. After following the assembly drawings I read through the fine print and warnings at the front of the book. Read First applies to installing garage doors unless you have installed several of the same type. Here in print is the sentence "Before fitting the door, the door opening and the building floor must be completely finished.". The topic of our garage door has been a large frustration as "Do it yourself builders" due to the lack of knowledge and support from Aktiv Bausatzhaus Südbaden GmbH. We will let you know if they should ever make it good with us in the future.
 Man Door Outside and Freezes
Well according to the plan our garage man door opens as it should be but several things are not as they should be so lets start. Delivered from Aktiv Bausatzhaus Südhaden GmbH this door did not fit within the rough opening of the architects drawing. The wiring was finished so cutting the door header and one jamb out to fit was not an easy option so I mounted the door on the outside as seemed planned. Not being used to working with plaster as an outside finish and since all of our other doors and windows had no drip mouldings I forgot about it in this instance as well. The green arrow in the next picture shows this area. Now that the plaster is finished driving rain drips down from the wall above the door and sits on top of the door or drips down on the inside of the door. Bad enough but it gets worse.
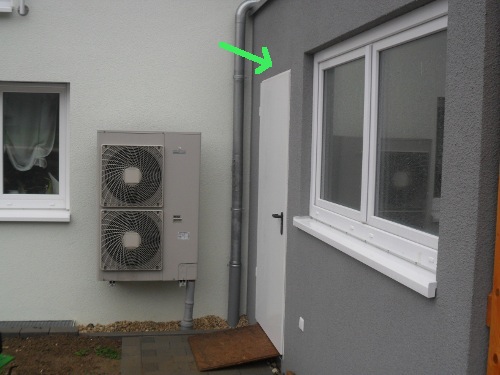 Heat Pump Fan behind Door!
Well it is definitely a consideration that the air coming out from your heat pump is about 5 degrees colder than that of the air going in. Yes, a wet door quickly freezes and at a temperature of zero degrees and with high humidity more moisture collects and freezes. Okay, mounting the outside unit of your heat pump on the house wall is not optimal but if it is there and near a door. I would recommend an insulated door. Perhaps Aktiv Bausatzhaus Südhaden GmbH has never had this arrangement so now reading this you are aware of the possible problems.
As a note we had asked for all of our doors to be keyed alike but this was not done so we have keyed this and our folding garage door to the same as the main entrance. We advise you to protocol all talks and meetings with your building company. Send your protocol to them and asked for it to be sent back signed.
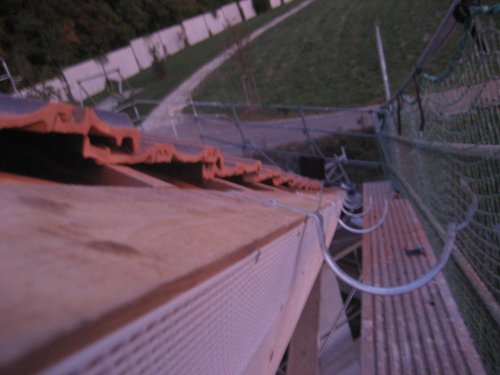
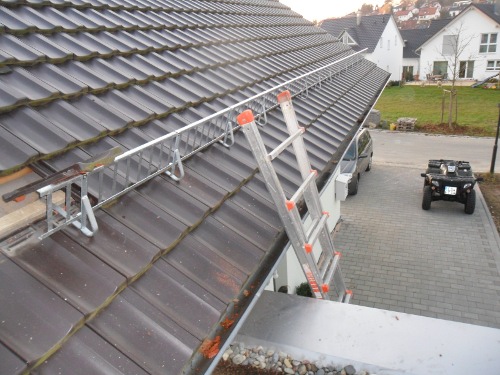 Adding a Snow Brake
-
What you might expect to be an obvious detail can be forgotten when you are building. We have seen this on several of our neighbors houses as well. That a building company forgets it I put up to price cutting. As you can see we have a large area of roof that dumps snow directly on our drive way and main entrance to the house. This feature of a snow brake is one of comfort and safety. Aktiv Bausatzhaus Südbaden loses some points here for forgetting the obvious.
This work can be done from a ladder but the best time to do this is just after you have placed the tiles and have a proper scaffolding to work from. You will need a piece of strapping a little longer than the brake's length. Add the brake, a bracket for every third tile, a few long and short screws, a hammer and you are ready to install a brake.
 Close up
-
Thanks Jasko, my ladder was not as suited for this work at this height. Often the strapping will be screwed down in the third row of tiles. This allows you later to be able to easily work on your eves trough if necessary. Adjust the height of the strapping so the brake will hang just below the lower edge of this third row of tiles. This allows you to be able to fit the tiles back in without being crowded. From this angle you can see how the bracket must be bent. The red arrow shows were you do not want much force to be applied to the tile. When loaded with snow the main pressure should be applied where the green arrow is or as uniformly as possible in the middle of the tile.
 Tiles need to have edges broken
-
In order for the bracket to lay on top of the bottom tile better, the top edge of the tile needs to be broken away. This is done easily with a hammer and will not be seen when the tiles are back in place. The bottom edge of the third row of tiles must also be removed where the bracket now sits so the tile can once again lay flat. Most use the hammer again but you can take the time to fit them better by using a small angle grinder. In an extreme exposure location the time might be worth the effort. The brackets are held loosely in place with a small wood screw.
There is no need to come back from a ski vacation only to be greeted by a ice hard frozen pile of snow in your drive way or to have someone or something damaged by heavy falling snow or ice. Do yourself a favor and install a snow brake or make sure your building company plans for it.
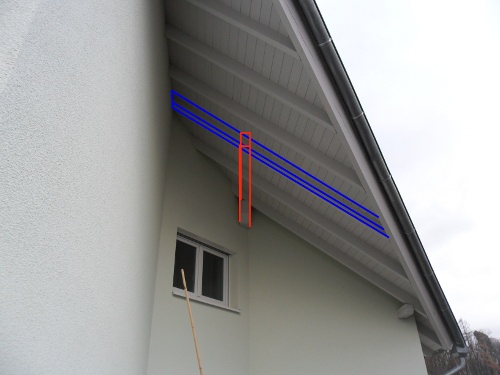
 New roof sagging.
-
Well it is a new roof that on this side looks 100 years old. Our overhang has been a topic of discussion since the first plans without it were given to the town office till as late as yesterday as we consider options. Many people were involved and questioned along the way so I will try to give you the condensed version. Hopefully if anyone should be considering having such an overhang you can build it without it looking 100 years old.
Our house footprint is an L shape. The original plan had a L shaped roof surface matching the footprint. Due to the fine print in the town building plans the roof needed to be angled from the inner corners of the L shape. The Ytong company could not supply one of their concrete roof systems that would handle the required loads. Aktiv took on the job of the new roof design. Aktiv told me the architect had sleepless nights trying to work with the new design. The design was completed and given to the framing company that sets the beams and rafters in place.
If done properly you will be given the option with your Ytong house to paint the wood members before assembly at your building site. At the framing company, Refuss, I asked the owner about the plans I saw of the beams and rafters. The design was done with cantilevered rafters ending at a long facer board extending from the corners of the overhang area. This is the simplest and cheapest method to do nothing special. The owner of Refuss suggested the only option we had was to use a post to the ground if the design should worry me. A post in the middle of our terrace was not desired so we went with the architects design hoping that he knew his occupation well.
 Stronger and still simple.
-
Now I have not done much studying of strength of materials or such but I have built a few things over the years. Without much thought here would be, in my opinion, a great improvement over our situation.
The middle beam for the rafters is a large multi-laminated beam that could have been very easily cantilevered out into the overhang area. I have shown this possibility in the red outline. Depending on the size and loading one could likely bring this as far as the third rafter thereby supporting more than half of the weight of the overhang. Cantilevering of such large beams is often seen in Austria and parts of Germany.
By doubling or sizing the rafters larger at the end of the beam as shown in blue, increased support for the facer board can be realized. As in our case if they had come to the third rafter the facer board would have much better supported. In Canada we do not do much work with rafters but enough to understand the basic principles. For our first German house 3 profession companies/persons were involved and all 3 failed miserably in my opinion. I will qualify that statement in that the facer board looks old and sagging but will likely structurally outlive all of our family.
P.S. Just as a secondary note there is a large wall surface underneath the overhang just waiting for an angle brace that could as well support the overhang.
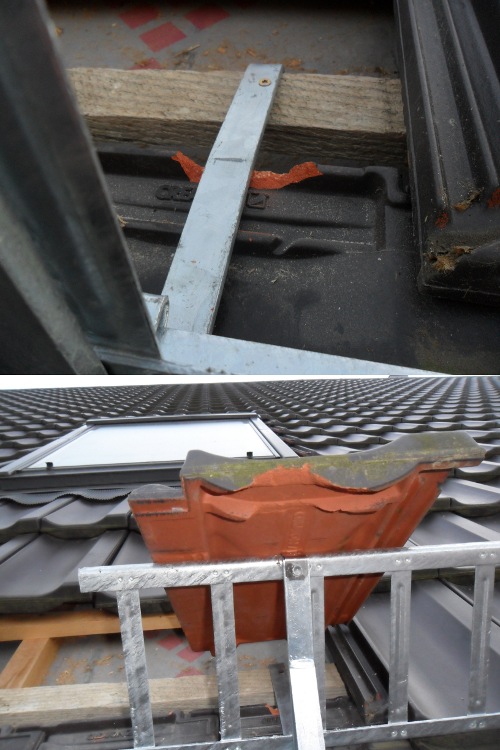
 Angled Eve Edge Board
This edge board must be flat or in plane with the roof strapping. This is the case for any angle eves or valleys on your roof. No one was sure at first until the company that installs the eves trough came along. They suggested the same trapizoidal shape as used at the horizontal eve. This is a mistake!
I had to remove the eves trough, brackets, screening and board. I replaced the board with a rectangular section board and then the other materials. It remains a question to me how all of our normal advisors did not know this detail. Now you know, and thanks Jesko for setting us straight.
August 1, 2009
October 2, 2009
November 9, 2009
November 23, 2009
June 26, 2010
October 9, 2010
November 13, 2010
November 14, 2010
November 14, 2011
December 17, 2011
Conclusions
Well there is not a lot to say other than, a lot of mistakes. I just didn't expect a company that has been doing building for many years to make as many mistakes.